
Tips for undergraduates, but perhaps useful for anyone.
Reasons to keep a laboratory notebook
- To provide yourself with a complete record of why experiments were initiated and how they were performed. You’ll forget if you don’t. Seriously: even in your youth your brain cells are senescing.
- To give yourself a central, physical place to record your data, to note statistical outcomes, and to paste graphs that show results. Researchers who keep these items in separate places are unlikely to be productive scientists.
- To encourage sound thinking. Keeping a notebook gives you a forum to talk to yourself — to ask questions, to record important thoughts about the experimental design, and to speculate on how your results might eventually be interpreted.
- To provide information to a person who is interested in continuing your research project, even if you deem that possibility hilariously unlikely. And if you’re doing important research and die an early, gruesome death, your colleagues might want to pick it up.
- To get rich. Not everyone sets out with the goal of patenting a process or contraption, but you might stumble onto something actually important, and in such an event you must have a notebook that supports your claims.
What to use as a laboratory notebook
- Purchase a notebook that possesses a stitched binding. Spiral-bound notebooks are undesirable because it is too tempting to rip out pages in moments of frustration or when you make silly mistake. And glue-bound notebooks are generally bad because glue doesn’t last over time (it ages and becomes brittle, plus cockroaches will eat glue). Ring binders and stacks of loose paper are unacceptable.
- Some laboratory notebooks have a “carbon copy” function that allows a duplicated sheet to be created and then removed to a second, safer location. I think these notebooks encourage bad notebook procedures and should be avoided. A proper notebook has a lot of glued-in information (printed graphs, datasheet templates, photographs, product labels, etc.) that simply will not show up on the sheet below, so the “carbon copy” notebooks are only good for archiving written entries. If you really want a backup of your notebook, make a daily date with a Xerox machine. For the truly motivated and/or paranoid, take a photograph of your completed pages each day with your smartphone and store the files in the cloud. Or get a camera equipped with Wifi that sends pics to a designated cloud folder automatically. [If you run a laboratory crawling with undergraduates, you might consider faking a notebook theft just to jar the students into considering these eventualities … it would be a good learning moment, plus good fun to see them all panic.]
- Notebooks come in a variety of dimensions. Those larger than a standard page are convenient because you can easily paste in printer output without using scissors. On the other hand, smaller notebooks are much easier to lug around in field conditions, and look cute. There’s a lot to be said for cute.
- More expensive notebooks have much nicer paper, so if you like a smooth, non-fibrous surface to write on, spend the extra money. Nothing beats smooth, expensive paper to boost creativity and productivity (but that’s just me, and I have a paper and pen fetish).
- Spend the extra money for a notebook that has pre-numbered pages. You probably can figure out how to number them yourself but it’s boring and life is short.
- If your parents or mentor are springing for the notebook, you might opt for the really, really expensive variety that lays completely flat when open. It’s a small thing, but it grows on you.
- If you want to keep a digital notebook, take a look at these reviews at The Chronicle, Nature, and Postdocexperience.
What to put on the outside of your notebook
- Put your full name and year of use on the front of notebook. And make it the actual year, not ’19. In 100 years that’s going to be so out of date.
- I also suggest adding your last name and date span (e.g., 2013-06 — 2013-12) on the spine so that you can find your research when it’s on a shelf with lots of other notebooks that look exactly alike (e.g., photograph). For writing on the spine I recommend light-colored paint pens.
- Put your mailing address, phone number, and e-mail on the inside cover. This information is useful when you foolishly leave your notebook somewhere. Tape a $5 bill to the inside front cover with a note saying, “I’ll give you another if you find this notebook.” If your research is priceless, it’s money well spent. It’s especially good to have wording like this if you do field research with your notebook.
- Bling. If the notebook is yours, take some pride in what you do and get crafty with the exterior. Good science is an inherently creative process, so I suspect most researchers have blinging talents even if repressed by years of scorn from colleagues.
General guidelines for maintaining a notebook
- Use a pen, never a pencil. As for what kind of pen, use a ball point, gel pen, or Rapidograph — all types of which have ink that can stand up to water and most solvents. If you know what you’re doing, a fountain pen with archival, waterproof ink (e.g., Bulletproof Black ink from Noodler’s) works well, too.
- Avoid using Sharpies (or equivalent). These markers are very good at resisting water spills but can be removed by many solvents. More importantly, permanent markers tend to bleed through to the underlying page, which makes for rather sloppy, illegible laboratory notebooks.
- Devote pages 1 and 2 to a Table of Contents (which you will fill in as time passes). Have 2 columns, one for the experiment name and one for the page number where an experiment starts, etc. If you come back to your notebook after 20 years, you will be able to quickly find the appropriate section of your notebook. This Table of Contents is also crucial for others who might want to use the notebook to reconstruct your activities.
- Never remove a page. This directive is to prevent unscrupulous researchers from “losing” data that might not have been favorable to their research objectives. If you rip out some pages you thought were unnecessary, others might reasonably view the gaps as suspicious.
- If you make a mistake, draw a thin line through the word or number rather than obliterating the entry with a blob of ink. You might decide, upon reflection, that your original entry was actually the correct one, and you will be glad that you can still read it.
- For the same reason, never use correction fluids (e.g., White Out) or strips of white laboratory tape.
- Write legibly. Your notebook does not have to be a work of art but it should be easily readable by another person of average intelligence.
- Provide the full date whenever you make an entry. Use the international standard format if possible: YYYY/MM/DD (e.g., 2019/01/11). Note: only the month gets a leading zero when just a single digit.
- There’s a fad in some fields to “recopy” notes into a different notebook at the end of the day. I think doing that is insane. Sure, you might have fresh insight when you’re recopying data and such, but you’ll invariably introduce copying errors (yes, even you). If you really think recopying is going to help your science, I suggest you record your “field” notes on one side of the notebook and then recopy and add insights onto the facing page. However, if you do fieldwork were it is likely that you’ll lose your notebook or it will be stolen by bands of thugs with machetes, recopying into a secondary notebook might make good sense (so don’t travel with both copies, just in case). Again, if you have a smartphone or wifi-enabled camera, just take daily photos of your pages and send them to the cloud.
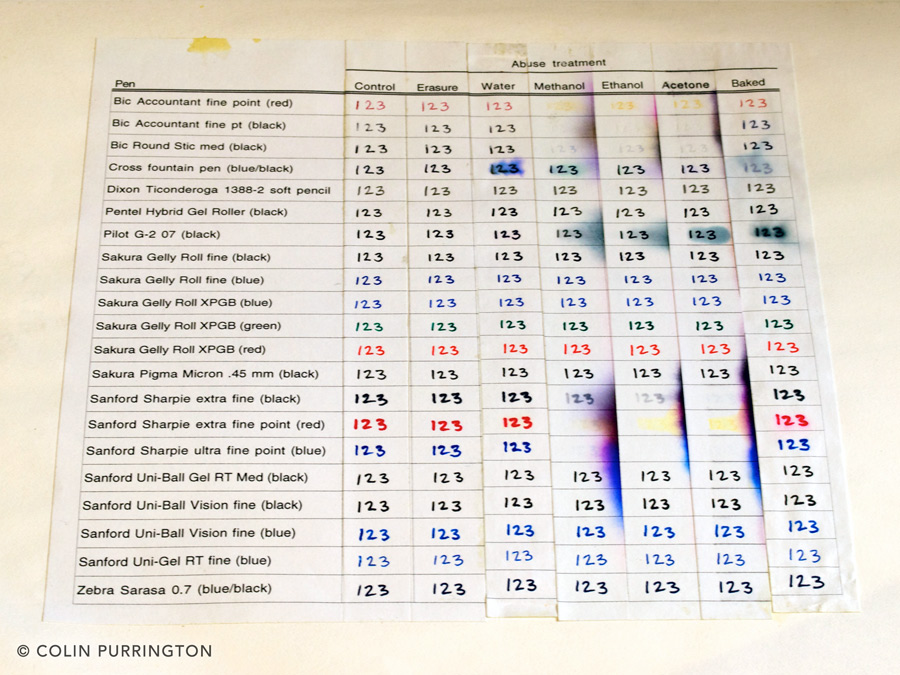
- BONUS: here’s what happens when you subject various pen inks to various solvents. I.e., even though you can’t erase most inks, a spill involving methanol, ethanol will cause ink to bleed or disappear. Even water dissolves some inks when heated (the “Baked” treatment).
What should go into your notebook
- Include detailed notes on all discussions and thoughts on your experimental goals. This means, of course, that you should start making dated entries immediately rather than waiting until you get your experiment(s) started. Because some information might come via e-mailed suggestions (from your mentor or colleagues) or from online sources (PDFs or web sites), you might paste “miniaturized” versions of relevant passages directly into your notebook rather than spending the time to transcribe. If it has a scrapbook feel, that’s what you want. Paste in some photographs, too.
- Eventually, include detailed experimental protocols that could be easily followed by another researcher. If you have typed out a detailed protocol in a computer file, print it out (shrinking it to make it fit nicely) and glue it into your notebook (it is worthless if you file it elsewhere). Give each experiment a name so that you can refer to it quickly in subsequent entries. All experimental protocols should be accompanied with clearly-worded hypotheses and goals, and indicate exactly what measurements are going to be taken.
- Provide full justification of all experimental details (species used, temperature, reagents, etc.). Justification might come as simple logic (stated, in your own words) or as references to other published research (e.g., voltages applied as per Frankenstein 1818, with full citation given).
- Annotate all calculations so that all numbers, concentrations, etc. are fully explained and would be interpretable by another researcher. Remember to include units.
- Give full details for all experimental organisms. Who provided seeds, plasmids, etc., and what information did they give you? Were seeds the result of open pollination, or were they from controlled crosses? If you bought organism yourself, give source, delivery conditions, etc. Include catalog numbers (e.g., Burpee LE-23001) when possible.
- For greenhouse experiments, write down details of potting media (brand, type) and pot (shape, dimensions, color, brand). Also record when plants were watered, fertilized, repotted, or repositioned. If other people are asked to care for your plants, ask person to keep a detailed log of when plants were watered and fertilized.
- Record reagent details. Details include vendor (name, address, phone number; in case you want to buy more in the future) and product information (brand, product number, chemical structure, purity grade, lot number, date of mixing/production, expiration date, etc.). Whenever water is used, specify deionized, distilled, tap, cold, hot, sterile, etc. Vast majority of these details might not affect your results but you never know.
- Record equipment details (brand, model number, sensitivity). In some circumstances it is important to record serial number, just in case there was something unique about the item you used. For growth chambers, always record bulb type and wattage (and brand name).
- Record field, greenhouse, laboratory, and growth chamber conditions such as temperature (in Celsius, ideally), humidity, barometric pressure, light levels, light/day cycle (hours of each, and when night starts), wind speed, wind direction, etc. Note that conditions sometimes change, so record these parameters often if variation is likely to affect your results.
- Sometimes, personal information should be noted. If you are interested in observing behavior of wounded bulls, note whether you are wearing a red shirt. Similarly, behavior of mosquitoes might be changed if you smell bad or use Axe Body Spray (you shouldn’t). Strange details like this can be important down the road. These personal details are also important if you are conducting psychology research — what you are wearing and whether you’re attractive can strongly influence the behaviors of your test volunteers.
- Record names of people providing assistance with data collection, techniques, statistical advice, equipment loans, stipend support, supplies funds. Write this information down immediately so that you remember to include it in your future acknowledgements sections when you publish your research. Keep notes about phone conversations and e-mail interactions.
- Make quick drawings of experiment set-ups, location of experiment in laboratory or greenhouse, etc. For field experiments, include a sketch of where field site is situated. These sketches do not have to be works of art.
- Attach photographs that document key experimental details.
- On the day you first enter data into a statistical program, write down the file name and where the file is stored (e.g., DVD on shelf in room 101; backup on laboratory computer in “Backup folder”). Give your file an informative name (e.g., “heat-exp1-2019-01-11.dat”) rather than “experiment1.dat” or “stats_hell.dat.”
- Make daily entries, even if to say just “Checked for mortality in Heat Exp 1; no mortality yet. They certainly look miserable, though.”
- Specify purpose for each entry, and reference an experiment name. If you just wrote, “Censused” for a particular date, you wouldn’t have a record of which experiment you censused or what specific data you were collecting.
- If you happen to record some data directly onto datasheets (e.g., Excel spreadsheets that exist on computers or within ring binders), include dated entries for all such occasions: “entered data onto heat-exp1-2019-01-11.dat spreadsheet.” Ideally, construct your spreadsheets so that you can paste them into your notebook, perhaps right after your experimental details are explained (you can flag the page so that you can easily find it when adding more data to empty cells).
- Detail all mistakes, problems with procedures, and lapses in data collection so that you can fully explain “odd” results at the end of your experiment. E.g., “I dropped seed #455 but found it on floor.”
- Use military time for all time entries (e.g., 1420 hrs). Or at least append AM/PM to all your times.
- All entries should be un-obscured by attached graphs, data sheets, photographs, etc. I.e., when you take a photograph of a page there shouldn’t be important information underneath attached items.
- When you include datasheets, photographs, graphs, product labels, etc., use staple to cleanly and permanently attach ONE edge. The reasoning (thanks, Dr R. Whitmarsh) is that if you ever have patent-related scrutiny of your notebook, you don’t want it to appear that you might have hidden something underneath the attached paper. If your attachment itself has something on the back, it’s best to make a copy of the underside and attach this copy so it is visible. This might seem fussy but doing so makes it easier to make a digital scan. If you’re Type A, it’s a good habit to write near the attachment (or underneath it) what it is; if the attachment falls out or is stolen, you know what you’re missing. Avoid tape (it becomes brittle and yellow) and glue (it usually fails unless of archival quality).
- Avoid making entries that are wholly unrelated to your project (e.g., “Don’t forget to mail fruitcakes”).
- Include the full names and contact information for all collaborators (in courses, this translates to “laboratory partners”). You will sometimes have, “see X’s notebook for further info,” and these entries will only be useful to other researchers if there is good contact information at the start of a particular experiment.
- At the conclusion of your experiment, or at the end of your course, write or print out a full directory of all electronic files that relate to your experiment. Staple into notebook.
- Describe the locations of all computer media, data binders, seeds, samples, etc., so that items can be located by others in the future. This information is best in tabular form (perhaps as an Excel or Word table printed and glued into your notebook). All seeds, DNA samples, etc. should be fully labeled with your name and date so that it is clear which notebook should be checked to learn more about the history of the sample.
- Typically, the laboratory notebook should stay in the laboratory where the experiments were conducted (i.e., with your mentor or employer). If you can’t part with it, make yourself a copy.
- Digital cameras with wifi (or Eye-Fi cards) are really cheap, so if you do expensive, important science I recommend that you have one camera per project. Equip each camera with a clear label (e.g., “Purrington”). At the end of each work day the researcher should take a photograph of each page. Images are then automatically beamed to cloud. Then when your experiment destroys the laboratory in big mushroom cloud, you still have a copy of everything and can repeat it. Also, when your trusted lab technician steals are your notebooks (like this person), you’ll have a backup. An additional benefit is that Principal Investigators can log into server on their iPhones to see laboratory activities even while sipping cocktails on the beach.